
Thursday, January 14, 2010
In Anaheim now as I type this, getting ready for a fun weekend at Disneyland. As another birthday nears, I'm thankful for having a sister and friends who are always exciting and young at heart, to remind me not to worry about growing up too fast. I doubt I'd ever have as much fun here without them, I wouldn't know where to start. This weekend is a reunion for my sister and I with our childhood friend from Las Vegas who has always been there for me to talk about all things food. So now after all these months I finally get to treat her to something more than a pretty picture and decided to whip up these blondies last minute (a little too last minute considering I was a few minutes late for work due to the delay). But it was worth it, especially to wake up and hear her and my sister last night take a bite of one as I laid half asleep in the other room. My biggest worry was that they would harden up once they were cool, but a quick sneak into the kitchen to rip off a corner of one and savor a bite proved that they remained irresistibly tender and delicious, even straight out of the refrigerator. Must have been Disney magic. White Chocolate Toffee Blondies 2 cups all-purpose flour Getting Ready: Center a rack in the oven and preheat the oven to 325 degrees F. Butter a 9×13-inch baking pan and put it on a baking sheet. Whisk together the flour, baking powder, baking soda and salt. Working with a stand mixer, preferably fitted with a paddle attachment, or with a hand mixer in a large bowl, beat the butter on medium speed until smooth and creamy. Add both sugars and beat for another 3 minutes, or until well incorporated. Add the eggs one by one, beating for 1 minute after each addition, then beat in the vanilla. Reduce the mixer speed to low and add the dry ingredients, mixing just until they disappear into the batter. Using a rubber spatula, stir in the chocolate and toffee. Scrape the batter into the buttered pan and use the spatula to even the top as best you can. Bake for about 40 minutes, or until a knife inserted into the center of the blondies comes out clean. The blondies should pull away from the sides of the pan a little and the top should be a nice honey brown. Transfer the pan to a rack and cool for about 15 minutes before turning the blondies out onto another rack. Invert onto a rack and cool the blondies to room temperature right side up. Cut into 32 bars, each roughly 2-1/4 x 1-1/2 inches.
adapted from Dorie Greenspan “Baking: From My Home to Yours”
3/4 teaspoon baking powder
1/2 teaspoon baking soda
1/2 teaspoon salt
2 sticks (8 ounces) unsalted butter, at room temperature
1 1/2 cups (packed) light brown sugar
1/2 cup sugar
2 large eggs
1 teaspoon pure vanilla extract
6 ounces bittersweet chocolate (I used white chocolate)
1 cup butterscotch chips or Heath Toffee Bits (I used 1/2 cup toffee bits, plus a roughly chopped Heath bar for extra texture)
Tuesday, January 12, 2010
With one week until school begins I find myself lamenting how quickly my five weeks of vacation flew by and how little free time I actually had. I blame it on the constant cycle of work that made the days go by faster and faster as they became indistinguishable. Work, eat, sleep, repeat. Now I'm saddened that I, once again, did not get to doing all the fun things that I had planned and day dreamed about instead of being attentive during last semester's classes. But I can't deny that I am excited for school and clinicals to start, so one could say that the fun has just begun for me.
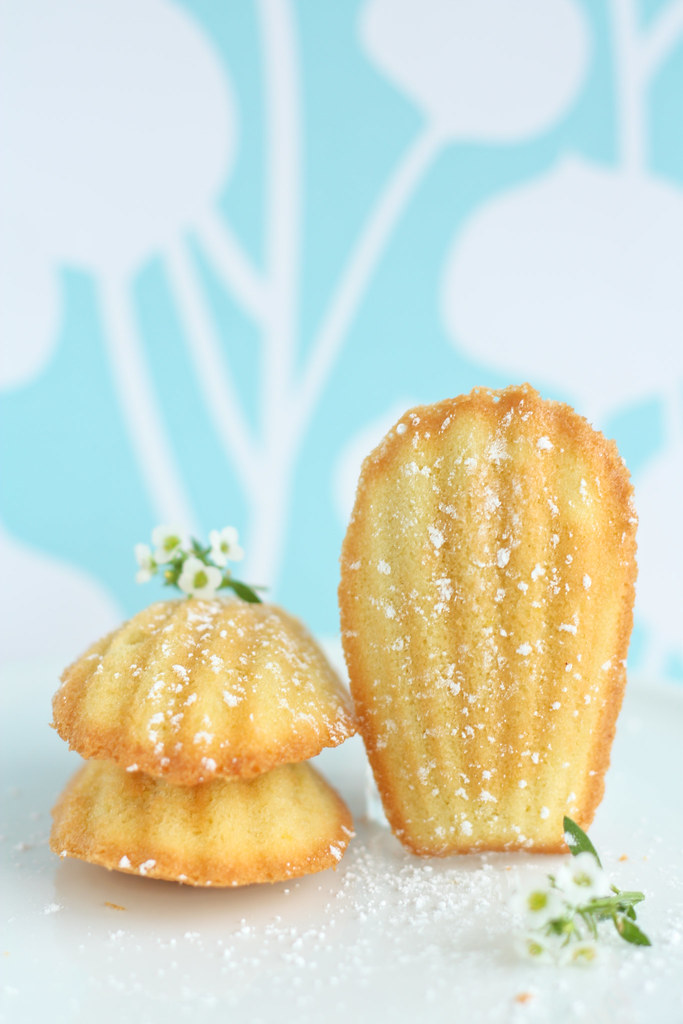
Now these madeleines were something I whipped up in the few hours in between waking up and heading to work at noon this morning. Just had to satisfy my baking fix. Now, I've made madeleines once before with great success. They're my father's favorite, he loves the ones baked up by the Sugar Bowl Bakery in San Francisco that are sold in Costco, so I wanted to see what he thought of these. I was delighted to hear from my sister the next day that they were devoured by the familyin one sitting. My one qualm about that batch of madeleines was that I slightly overfilled the pan, which ruined the ideal shell shape. So I noted that I would have to make them again properly in order to document them here.
However, this time around I used a different recipe from 101 Cookbooks. That looked promising and was deemed "fail-safe", but I couldn't help but notice the lack of baking powder and refrigeration in the recipe. Now, baking powder I know is not a MUST in all madeleine recipes, but in my previous research I came up on a lot of emphasis regarding refrigeration, sometimes anywhere from 2 to 4 hours. But I pressed on and followed the recipe regardless. Now maybe it was my use of a handmixer as opposed to a stand mixer, but when I pulled the first tray of madeleines from the oven I was discouraged to find that they had not developed that signature hump nor had they risen at all. The backs were sunk in and they stuck to the pan. So, crossing my fingers, I sprinkled a small amount of baking powder into the remaining batter, gave it a good fold and hoped for the best. I even stuck the filled madeleine pan into the freezer for a good ten minutes. To my relief they came out much better, not humpy, but nicely puffed up. Now, I want to say that it must have been something that I did wrong that caused the problem, because I'm sure that the recipe, which has given others so much success, can't be flawed. But I'll be sticking with my original madeleine recipe, which is what I'll be typing up here. For the other recipe, see here.

Madeleines (adapted from Baking From my home to yours by Dorie Greenspan)
2/3 Cup All-Purpose Flour
3/4 tsp Baking Powder
Pinch of salt
1/2 Cup Sugar
Grated zest of 1 Lemon
2 Large Eggs, at room temperature
2 tsp Pure Vanilla Extract
3/4 Stick (6 Tbsp) Unsalted Butter, melted and cooled
Confectioners' sugar, for dusting
Whisk together the flour, baking powder and salt.
Working in a mixer bowl, or in a large bowl, rub the sugar and lemon zest together with your fingertips until the sugar is moist and fragrant. Add the eggs to the bowl. Working with the whisk attachment, or with a hand mixer, beat the eggs and sugar together on medium-high speed until pale, thick and light, 2 to 3 minutes. Beat in the vanilla. With a rubber spatula, very gently fold in the dry ingredients, followed by the melted butter. Press a piece of plastic wrap against the surface of the batter and refrigerate it for at least 3 hours, or for up to 2 days. This long chill period will help the batter form the hump that is characteristic of madeleines. (For convenience, you can spoon the batter into the madeleine molds, cover and refrigerate, then bake the cookies directly from the fridge; see below for instructions on prepping the pans.)
Getting ready to bake: Center a rack in the oven and preheat the oven to 400˚F. Butter 12 full-size madeleine molds, or up to 36 mini madeleine molds, dust the insides with flour and tap out the excess. Or, if you have a nonstick pan (or pans), give it a light coating of vegetable cooking spray. If you have a silicone pan, no prep is needed. Place the pan(s) on a baking sheet.
Spoon the batter in the molds, filling each one almost to the top. Don't worry about spreading the batter evenly, the oven's heat will take care of that. Bake large madeleines for 11 to 13 minutes, and minis for 8 to 10 minutes, or until they are golden and the tops spring back when touched. Remove the pan(s) from the oven and release the madeleines from the molds by rapping the edge of the pan against the counter. Gently pry any recalcitrant madeleines from the pan using your fingers or a butter knife. Transfer the cookies to a rack to cool to just warm or to room temperature.
If you are making minis and have more batter, bake the next batch(es), making certain that you cool, then properly prepare the pan(s) before baking.
Just before serving, dust the madeleines with confectioners' sugar.
Monday, January 11, 2010

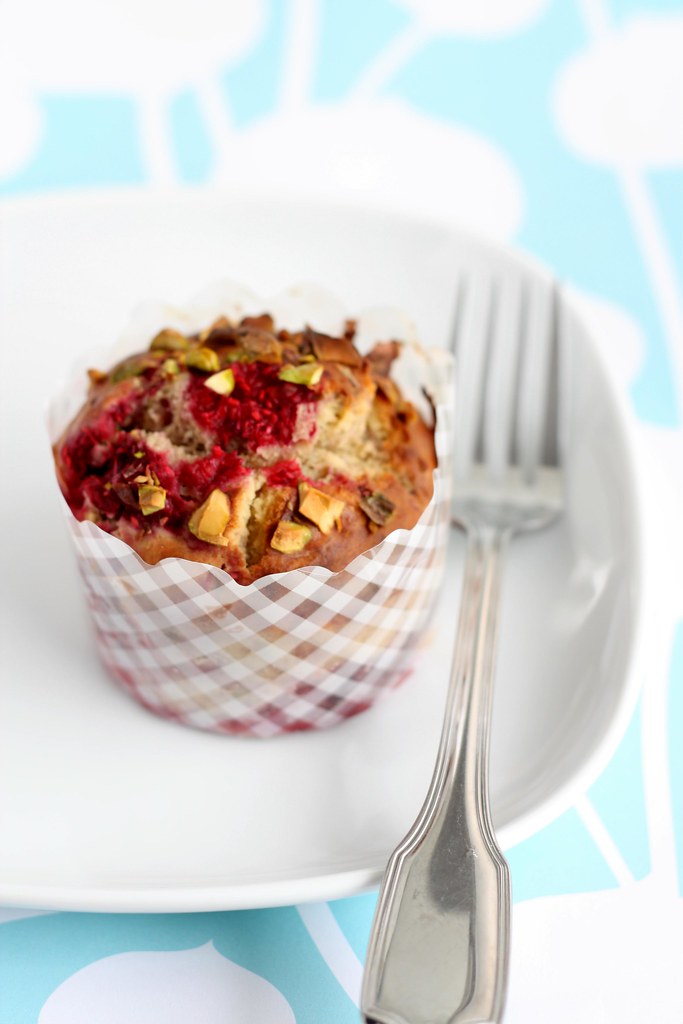
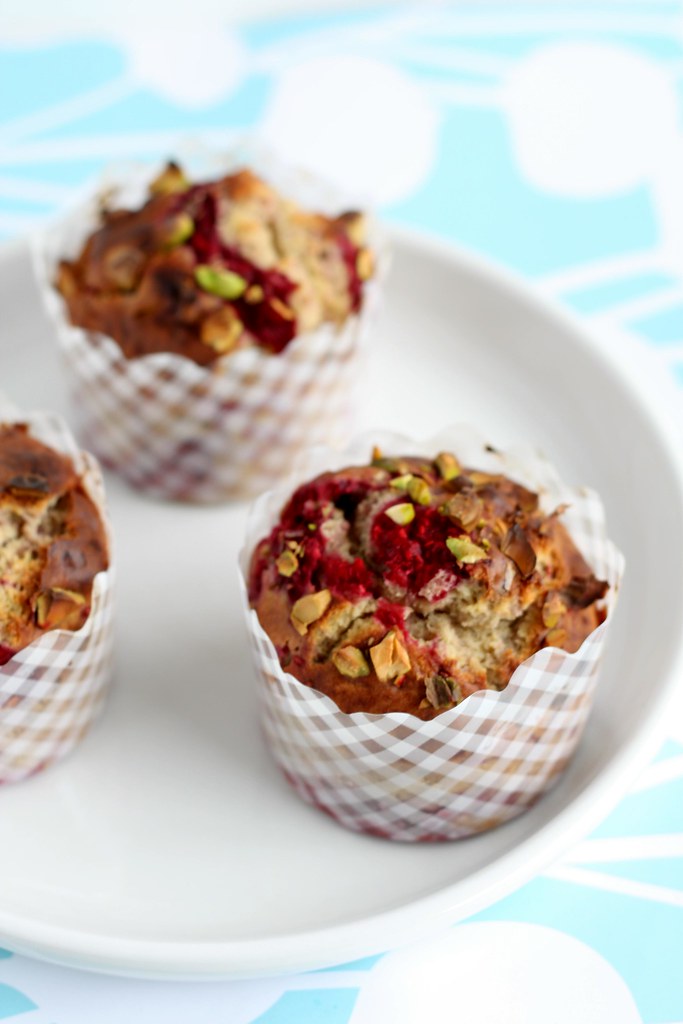
The days are dwindling fast until school starts up again and my life gets lost in a whirlwind of classes, work, and clinicals. Free days are becoming a rare commodity and considering that I will be gone for half of the last week of my vacation (celebrating my 20th birthday in Disneyland with my sister and friend), I realize now that I have very few opportunities to bake at my leisure. That's why I woke up early this morning in order to take advantage of this and over my bowl of cereal I quickly began to rack my brain for a relatively simple recipe that utilized the ingredients I had on hand.
Then of course, I had to factor in my dying need to use the adorable baking cups I purchased from Daiso (a Japanese goods store) a few weeks ago. So then I finally settled on making teacakes, which--maybe due in part to their simplicity--I had never made before.
Meanwhile, while I love the versatility of my new camera, I'm still struggling to achieve that bright, sunny look--but there's not much that can be done about that when shooting on a foggy Bay Area day. Keeping that in mind, I am content with the results.
Here is the recipe, adapted from Tartelette.
[As you may have noticed, I am notorious for attempting to make the smallest possible portion of any recipe and so I divided the recipe in half, which yielded exactly three muffin-sized teacakes. ]
Raspberry Pistachio Teacakes Recipe:
Makes about a dozen
1 cup (120gr) pistachios, raw, divided
1/2 cup (110gr) dark brown sugar, packed
2 large eggs
1 stick (113gr) unsalted butter, melted and cooled
1 teaspoon (5gr) vanilla extract
1 1/2 cups (205gr) cake flour
pinch of salt
1 teaspoon (4.6gr) baking powder
1 1/2 cups (185gr) fresh raspberries
Preheat the oven to 350F. Lightly spray or butter 10 to 12 muffin cups or tins.
Coarsely chop the pistachios and set aside.
In a stand mixer fitted with the paddle attachment (or with hand held beaters), whisk together the sugar and the eggs on medium speed, until thick, about 2-3 minutes. Lower the speed and with the machine running, add the butter, vanilla extract, cake flour, salt and baking powder. Increase the speed to medium and whisk until just incorporated. By hand, fold in the raspberries, being careful not to break them up too much and half of the reserved pistachios. Divide evenly between the muffin tins (or other small molds). Sprinkle the remaining half a cup of pistachios evenly over the cakes. Bake for 20 minutes or until golden brown. Let cool on wire racks.
Thursday, January 7, 2010
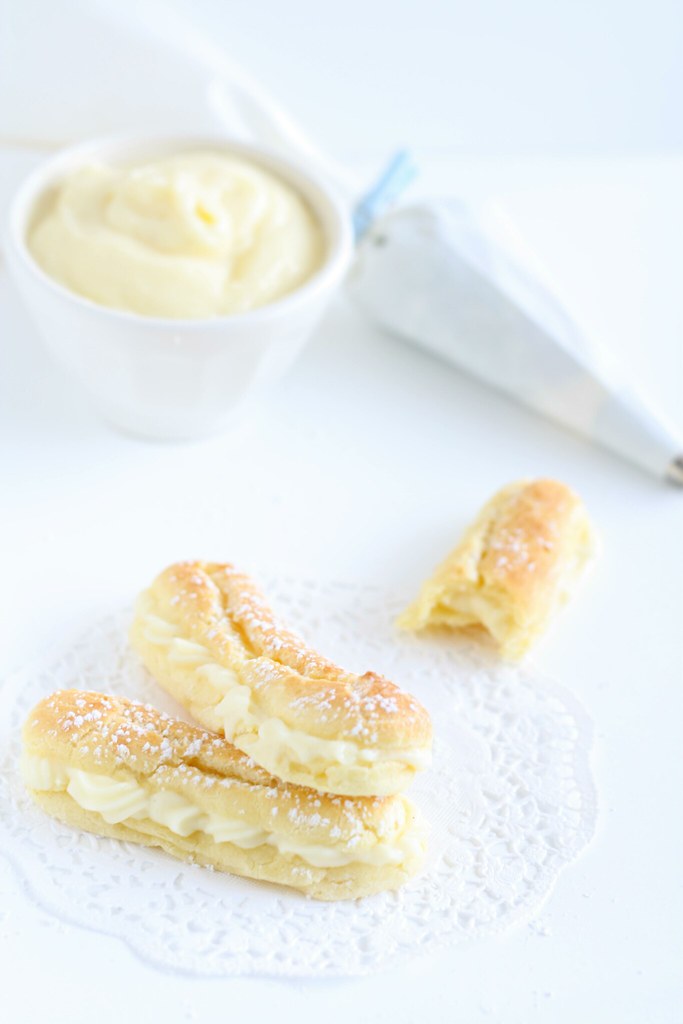
My brief trip to Paris last November had me swearing upon my return that I could never again be tempted by the baked goods that my home country had to offer. It didn't take me long, however, to realize my folly. I much as I do miss the light, cloud-like vanilla eclairs of Laduree, I no longer consider it infidelity to crave treats from San Francisco gems such as Miette and Tartine. One of my favorite Christmas gifts (along with my new Easy Bake, but more about that in a later post) is the Tartine cookbook.
 The only thing that makes a great recipe better is when it carries over into another great recipe. This greatness is applicable to the Apple Frangipane Tart that graced my Christmas dessert spread. Case in point, Raspberry Bakewell Tartelettes made from the irresistibly fragrant vanilla bean frangipane left over from the apple tart. I've wanted to make a Bakewell tart ever since the Daring Bakers flooded Tastespotting with their beautiful tarts (er, puddings?) and I finally got my chance, albeit months later. But more importantly, none the less delicious. This was also a chance to use the precious raspberry preserves I brought back with me from my recent trip to Paris that I feared I treasured so much that I could never get myself to use it. Worth it? Yes indeed.
Makes one 23cm (9” tart)
225g (8oz) all purpose flour
30g (1oz) sugar
2.5ml (½ tsp) salt
110g (4oz) unsalted butter, cold (frozen is better)
2 (2) egg yolks
2.5ml (½ tsp) almond extract (optional)
15-30ml (1-2 Tbsp) cold water
Sift together flour, sugar and salt. Grate butter into the flour mixture, using the large hole-side of a box grater. Using your finger tips only, and working very quickly, rub the fat into the flour until the mixture resembles bread crumbs. Set aside.
Lightly beat the egg yolks with the almond extract (if using) and quickly mix into the flour mixture. Keep mixing while dribbling in the water, only adding enough to form a cohesive and slightly sticky dough.
Form the dough into a disc, wrap in cling and refrigerate for at least 30 minutes
Assembling the tart:
Preheat oven to 200C/400F.
Remove shell from freezer, spread as even a layer as you can of jam onto the pastry base. Top with frangipane, spreading to cover the entire surface of the tart. Smooth the top and pop into the oven for 30 minutes. Five minutes before the tart is done, the top will be poofy and brownish.
The finished tart will have a golden crust and the frangipane will be tanned, poofy and a bit spongy-looking. Remove from the oven and cool on the counter. Serve warm, with crème fraîche, whipped cream or custard sauce if you wish.
When you slice into the tart, the almond paste will be firm, but slightly squidgy and the crust should be crisp but not tough.
.jpg)