
Thursday, March 3, 2011

You know when you finally convince yourself to buy that special, expensive ingredient and as soon as you place it in your pantry it just sits there...to special to be used. That happens to a lot of the things I buy. As you can probably attest to, baking isn't exactly the cheapest hobby. Over the next few weeks I'm forcing myself to suck it up and use some of my coveted ingredients that have been sitting around. In the next few weeks expect to find a dessert incorporating the chestnut cream I bought on my last trip to Paris that I just haven't had the heart to use yet. But for today, the star of the dish is the almond meal that was tucked away in my refrigerator.
The recipe is a combination of the shortbread crust from my favorite lemon bar recipe and the almond cream (frangipane) recipe from the (equally coveted and rarely used) Tartine cookbook.
Raspberry Frangipane Slice
3/4 cup all-purpose flour
1/3 cup powdered sugar
1/4 cup plus 2 tablespoons unsalted butter, softened
1 cups almond meal
1/2 cup sugar
7 tablespoons unsalted butter, room temperature
1 large egg
1 tablespoon whole milk
1/2 teaspoon almond extract (optional)
pinch of salt
1/4 cup raspberry jam (or as desired)
Preheat oven to 350 degrees F. Grease an 8x8 inch baking pan. Combine the flour, powdered sugar, and the first amount of butter. Pat dough into prepared pan. Bake for 15 minutes.
Meanwhile, make the frangipane topping. Beat the butter on medium speed until creamy. Add the sugar and mix to incorporate. Add the almond flour and beat until thoroughly combined. Add the salt, almond extract (if using), and egg and mix until incorporated. Add the milk and beat until light and fluffy.
Spread raspberry jam (or any flavor that you like) on the warm crust. Pour the frangpiane mixture on top of the jam layer and spread evenly with an angled spatula, making sure to cover the jam completely.
Bake for 25-30 minutes or until golden brown. Halfway through baking sprinkle sliced almonds on top of the frangipane if desired. Cool completely before cutting to serve.
Friday, February 4, 2011

A close friend of mine was celebrating her birthday earlier this week and while I was consulting with her regarding her birthday treat she jokingly suggested "red velvet cookies". I instantly replied "Done!" because I had seen so many adorable looking red velvet cookies online all week. She was surprised that such a thing existed and I assured her that in the food world "anything and everything is possible". I had fallen in love with the cute, crackly cookies I spotted on Babble. However, when I made the recipe myself using the homemade version based on a Paula Deen recipe they came out more like whoopie pies than cookies. Rest assured that my disappointment was short lived as these cookies are delicious, especially the day after they are assembled and the cream cheese filling has a chance to moisten the cookies. If anyone decides to try out the cake box version available on Babble, please let me know if those turn out flat and crackly like in the pictures.
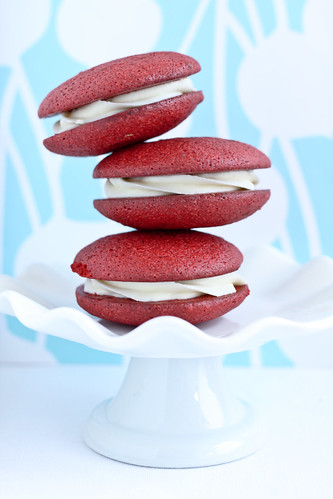
Red Velvet Whoopie Pies (adapted from here)
1/4 cup butter
1 cup sugar
2 eggs
2 tablespoons buttermilk
1 teaspoon vanilla extract
1 tablespoon red food coloring
1 1/3 cups all-purpose flour
4 tablespoons cocoa powder
1 teaspoon baking powder
1/4 teaspoon baking soda
1/2 teaspoon salt
Preheat oven to 375 degrees F. In a large mixing bowl, cream together butter and sugar. Add in eggs one at a time, beating after each addition. Beat in buttermilk, vanilla and red food coloring. In a separate bowl, whisk together flour, cocoa powder, baking powder, baking soda and salt. Stir the dry ingredients into the wet.
Scoop dough onto a lined cookie sheet (I piped mine) using a generous medium scoop (2-3 tablespoons). Bake at 375 degrees F for 10-12 minutes until centers appear set. Allow to cool slightly. Then pull the liner onto the wire cooling rack to cool completely.
Cream Cheese Filling 8 ounces cream cheese Cream together cream cheese and butter in a medium bowl. Beat in milk and vanilla. Sift powdered sugar over the wet ingredients and beat in until smooth. Spread in between two cooled red velvet cookies (again I piped mine, just seems cleaner and easier). Makes 10-15 sandwiches.
4 tablespoons butter, softened
2 teaspoons milk
1 teaspoon vanilla
4 cups powdered sugar
Thursday, December 16, 2010
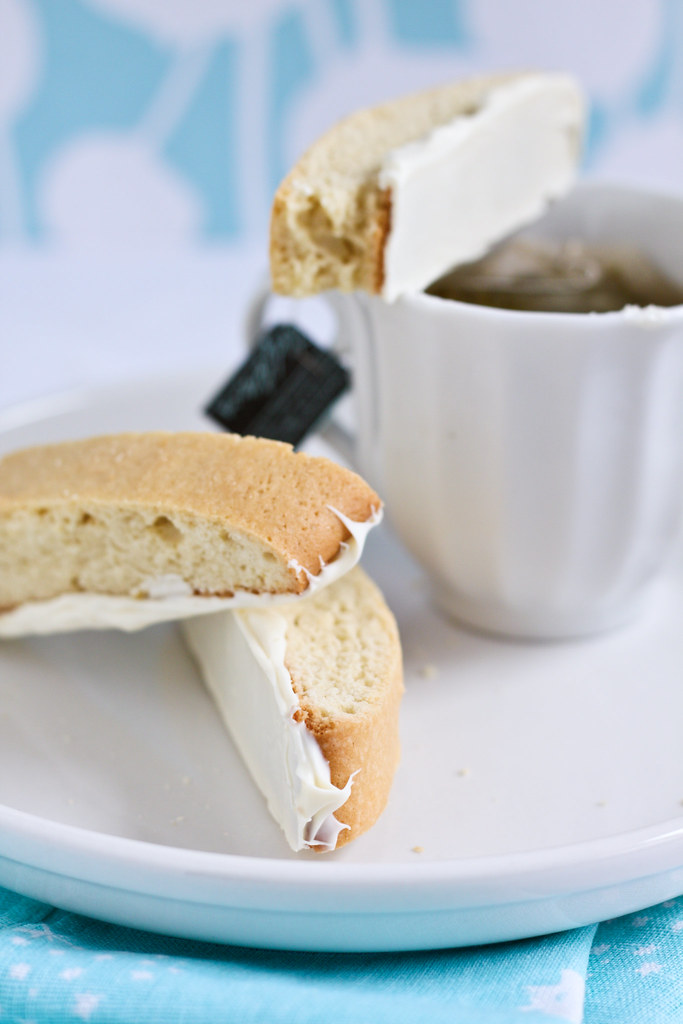
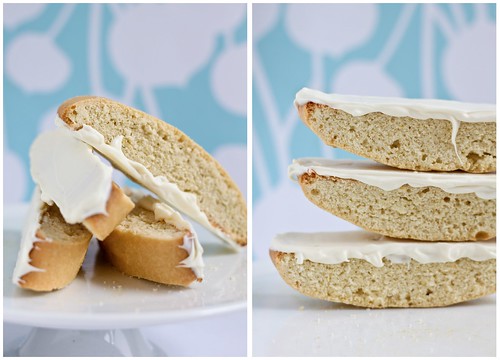
These biscotti were whipped up short notice to fill a sudden craving my mom had for something sweet. I've had quite a few biscotti recipes bookmarked and was really intrigued by all the different methods used. Some recipes used butter, others oil, or even both. And a few recipes I came across used neither. For my purpose, I decided to go the traditional route and make my biscotti with olive oil.
Now, if you know me well enough by now, I hardly ever make a full recipe. However, this time I went one step further and actually didn't complete the full list of instructions. Biscotti gets its crunchy texture from a "twice-baked" method. The dough is formed into a log, baked, removed from the oven, sliced, then baked again. This makes biscotti the perfect dipping cookie for coffee, teas, or simply milk. However, I don't drink coffee or milk and although I love tea, I don't have it all too often. So I decided to make "soft-baked" biscotti. After baking the dough as a log, removing it from the oven, and slicing it, I allowed the cookies to cool and left it at that. Then I dipped the bottoms in white chocolate...well actually, I tried to dip them, but without success. What I found worked better and yielded a more aesthetically pleasing result was simply spooning the melted chocolate onto the bottom of the biscotti, then spreading it cleanly with a small angled spatula. Then I set them carefully down on their rounded (undipped) side and allowed them to dry.
Well, whichever way you decide to make these--crisp or soft, dipped or spread with chocolate--I assure you, you'll love the combination of delicate
Below I'm posting the recipe in its entirety. Including the steps that I decided to skip. Because I tend to adapt recipes, I often make mistakes when retyping them into my blog. So please if you see any discrepancies, let me know and I will amend it as soon as possible.
White Chocolate Lemon Biscotti (adapted from here and here)
1/4 cup light olive oil
3/4 cup white sugar
2 teaspoons vanilla extract
1 teaspoon lemon extract (or to taste)
2 teaspoons lemon zest
2 eggs
1 3/4 cups all-purpose flour
1/4 teaspoon salt
1 teaspoon baking powder
1 1/4 cups (6-ounce) bar premium white chocolate, chopped
Preheat the oven to 300 degrees F. In a large bowl, mix together oil and sugar until well blended. mix in the vanilla and lemon extracts and zest, then beat in the eggs. Combine flour, salt, and baking powder; gradually stir into egg mixture.
Divide dough in half. Form two logs (12x2 inches) on a cookie sheet that has been lined with parchment paper. Dough will be very sticky; wet hands with cool water to handle dough more easily.
Bake for 35 minutes in the preheated oven, or until logs are light brown. Remove from oven, and set aside to cool for 10 minutes. Reduce oven heat to 275 degrees F.
Cut logs on diagonal into 3/4 inch thick slices. Lay on sides on parchment covered cookie sheet. Bake approximately 8 to 10 minutes, or until dry; cool.
Meanwhile, melt the white chocolate in a double boiler or using your preferred method. When the biscotti is cool, dip, spread, or drizzle white chocolate and allow the cookies to dry on a cookie sheet before storing in an air tight container.
Friday, December 10, 2010

After a long hiatus, this blog is finally back in action. During the past few months of this break I've been able to concentrate on school and clean up my diet. Perhaps a greater influence on my blogging than my academic schedule has been my attempt to overcome my dependency on sugary sweets. Today I am very happy to say that one of these bad boys is the first homemade treat that I've had in months. And as delicious as it was, there was something different. The way I felt when I ate it was different...less ravenous. I savored every bite of it, but when it was over I didn't run back for more.
Now although this new found lifestyle may mean great things for me, I'm not exactly sure what the significance is for my blogging. This holiday season will definitely warrant much more baking and testing of my self control. So for now, I'll resist making any predictions until the end of the holidays. Enjoy yours, as I enjoy mine...and try these cupcakes!
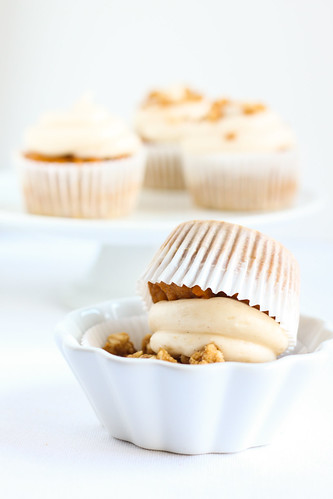
These cupcakes were made using the leftover batter I had after making a pumpkin bundt cake for an end-of-the-semester/Christmas party on Wednesday night. Like the cake, they are topped with a cinnamon cream cheese frosting, but are taken a step further with a sprinkling of brown sugar crumble.
Pumpkin Cupcakes (allrecipes)
2 cups white sugar
1 1/4 cups vegetable oil
1 teaspoon vanilla extract
2 cups canned pumpkin
4 eggs
2 cups all-purpose flour
3 teaspoons baking powder
2 teaspoons baking soda
1/4 teaspoon salt
2 teaspoons pumpkin pie spice
Preheat the oven to 350 degrees F. Sift together the flour, baking powder, baking soda, salt, and spices. Set aside.
In a large bowl, combine sugar and oil. Blend in vanilla and pumpkin, then beat in eggs one at a time. Gradually beat in flour mixture. Pour batter in muffin tin, filling cups 3/4 full.
Bake in the preheated oven for 18-20 minutes, or until a toothpick inserted into the middle of a cupcake comes out clean.
Cinnamon Cream Cheese Frosting (allrecipes)
2 (8 ounce) packages cream cheese, softened
1/2 cup butter, softened
2 cups sifted powdered sugar
1 teaspoon vanilla extract
1 teaspoon cinnamon
In a medium bowl, cream together the cream cheese and butter until smooth. Mix in the vanilla, then gradually stir in the powdered sugar. Mix in cinnamon, add more if desired. Store in the refrigerator after use.
Brown Sugar Crumble (allrecipes)
1/2 cup quick-cooking oats
1/2 cup all-purpose flour
1/2 cup brown sugar
1/8 teaspoon baking powder
1/8 teaspoon baking soda
1/4 cup butter, melted
Line a sheet pan with foil. Combine oats, flour, brown sugar, baking powder, baking soda, and melted butter together. Crumble onto sheet pan, cover and refrigerate for at least 1 hour. Preheat oven to 350 degrees F. Bake crumble for 10 minutes or until brown, watching carefully.

Thursday, August 5, 2010
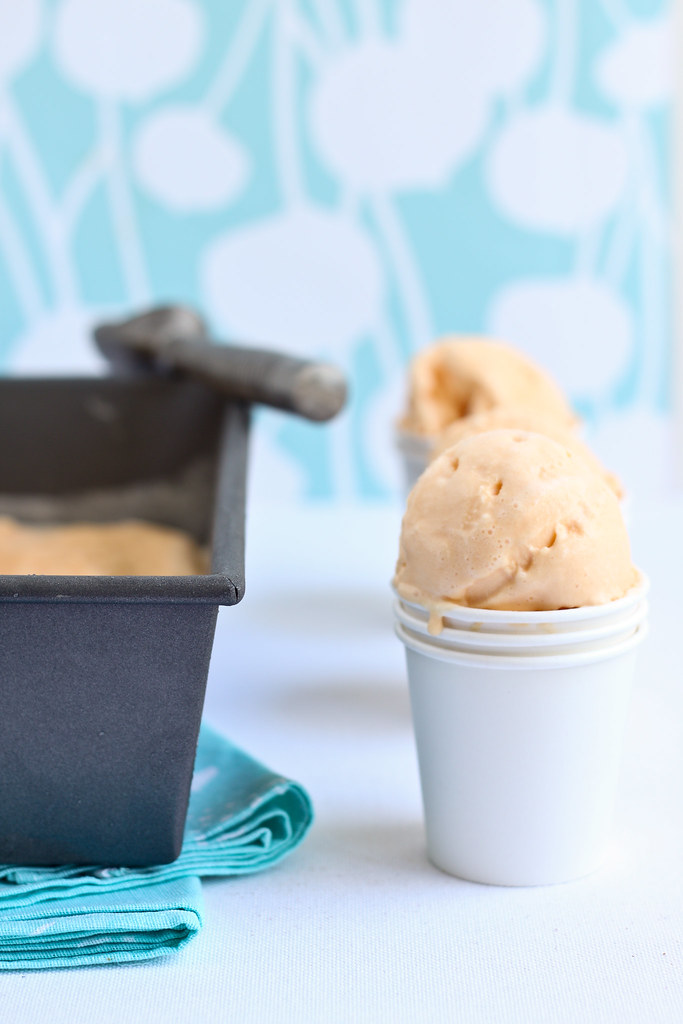
I only recently discovered my fondness for Orange Sherbet. I recall throughout my lifetime hearing others exclaim their love for the treat and disregarding them almost instantly. It was a chance encounter with a grocery store Orange Sherbet ice cream cake, something that I would normally overlook without a second thought. Soon, a small slice turned into a second and a third...an accompaniment to my breakfast cereal, an after school snack...until one day, it was gone. There was something undeniably nostalgic about the flavor that I just couldn't place. And then suddenly, I had it. I even called my sister from across the house to have a taste and confirm my suspicion. Orange Sherbet tasted oddly like...Fruity Pebbles. Yes, Fruity Pebbles: a childhood favorite from my pre-gourmet days. A flavor-memory that I still find hard to resist when it crosses my path. Definitely a guilty pleasure of mine.
Behold, my hand-churned orange sherbet. Now before you start thinking that you ought to be impressed...my decision to hand-churn the ice cream was based more on desperation than inspiration. I had prepared and chilled my rather impromptu sherbet mixture and was starting to assemble the ice cream maker attachment on my KitchenAid stand mixer when I realized that the adapter was missing. What ensued first was panic, then frustration, and finally...insanity.
My freezer bowl was already out and starting to condensate. I had to act quick. I grabbed the chilled mixture and poured it into the bowl. I hastily set the microwave timer to twenty minutes, grabbed the plastic churner and began to spin the bowl with my left hand, while my right hand clenched tightly onto the top of the churner. I tried my best to keep my knuckles away from the freezing mixture. The end result was light and slightly creamy, with the tiny ice crystals characteristic of a sherbet. Thanks to my unwavering will and endurance, the consistency is exactly what I expected to achieve if I had used the ice cream maker.
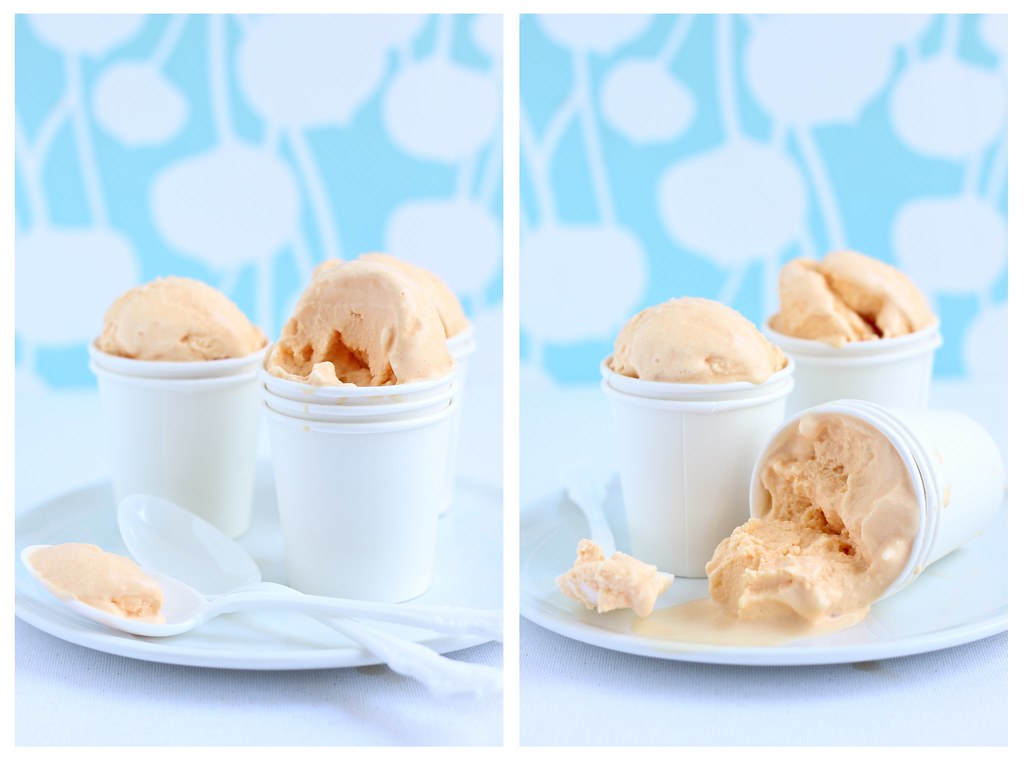
This orange sherbet is not so much the result of a recipe, but the outcome of trial and error. I'm so embarrassed by my method that I won't even attempt to post a recipe or instructions. I simply took a few scoops of vanilla ice cream (cheating? perhaps, but I told you this was very impromptu), a teaspoon and a half of vanilla, a splash of milk perhaps (I used soy), and enough orange juice concentrate to achieve the flavor you want.
Not really faithful to a real Sherbet at all I suppose, but it satisfied my (Fruity Pebble) craving.

Wednesday, July 28, 2010

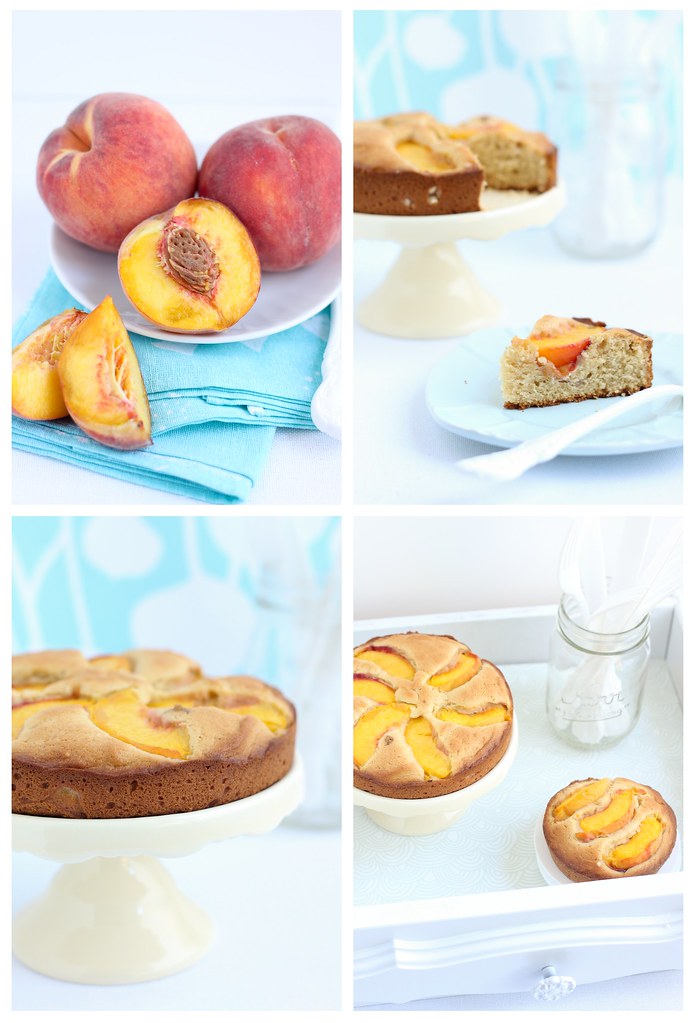
I'm a bit apprehensive as I type this and soon you'll understand why. When my mother came home yesterday she brought along a small bag of peaches from her best friend's backyard. She told me that she would be out of town for the next two days and knowing that most of my clandestine baking happens while she's gone, she commissioned me to make a peach cobbler. Nothing fancy, no individual ramekins: just one simple cobbler.
Well I guess I don't take directions well unless they're part of a recipe that promises something delicious at the end. I convinced myself that if I made an alternative to cobbler that was simple, yet delicious enough to win over my mother, I would be in the clear. So I began my search for the perfect simple peach recipe. I found my answer in Dorie Greenspan's Dimply Plum (Well, Anything) Cake. I've always been an obedient daughter, but I suppose baking must bring out my inner rebel, because I had the audacity to make miniature cakes as well.
The cake smelled delicious sitting in the oven and I was so sure of my success. The first downhill turn was when I pulled the cakes out (the 6" cake and the 3" mini cakes) at 20 minutes and found them a little too dark along the edges. I tried to stay hopeful as I proceeded with picture taking and when I finally shut off my camera, I grabbed a slice and took a bite straight off the prop fork. Dry. Well, at least, not moist enough for my liking. Nothing too spectacular in terms of taste, but I'll also admit that the peaches from her friend didn't taste so good on their own to begin with.
Even still, I was disappointed and consequently worried about how my mother will receive the not-so-cobblery cakes when she returns. Whenever I run into a recipe I don't favor, especially from a source as reliable as Dorie Greenspan, my first assumption is that the fault is my own. Can someone please let me know if the cake is meant to be slightly dry? Am I missing out on something?
I'll be sure to give it a try again tomorrow morning and hope for the best, but my expectations aren't high.
You can find the recipe here.
* Just as I went to retrieve the link for the recipe, I skimmed through the recipe commentary over at Bake-En and am instilled with new hope. "Dorie says that the first day the cake is like corn bread and the 2nd and 3rd days it's soft and moist. Perhaps I'll fall in love with it tomorrow." This is somewhat reassuring and now I am a little more excited for what breakfast might reveal. Perhaps it's the juices of the fruit permeating through the cake that makes it more moist over time...but for now that's just speculation. I'll find out for sure tomorrow. I knew Dorie wouldn't let me down so hard...
Meanwhile below is a Before & After project I took on, my first really. I saw this worn-out, shabby chic end table outside of a neighbor's house as I drove to work one morning. When it was still there on my way home from work the next day, I quickly pulled over and timidly went to go knock on the door and inquire about it. Fortunately for me, the homeowner walked right out to retrieve her child's toys outside and when I asked her about it, she gladly let me have it for free. I giddily placed it in my trunk and drove the half a block to my house where I immediately got started. After smoothing it down with a power sander, I vacuumed it and wiped it down. Then the next day I spray painted it bright white. Dozens of adorable color combinations flooded my mind, but for my first project I decided to keep it simple and clean...and easy to coordinate. It took me years of admiring Before & After projects for me to finally tackle one myself. Now I won't hesitate to pull over when I see a promising find. You can click here and here to see the "before" photos.

Sunday, July 25, 2010
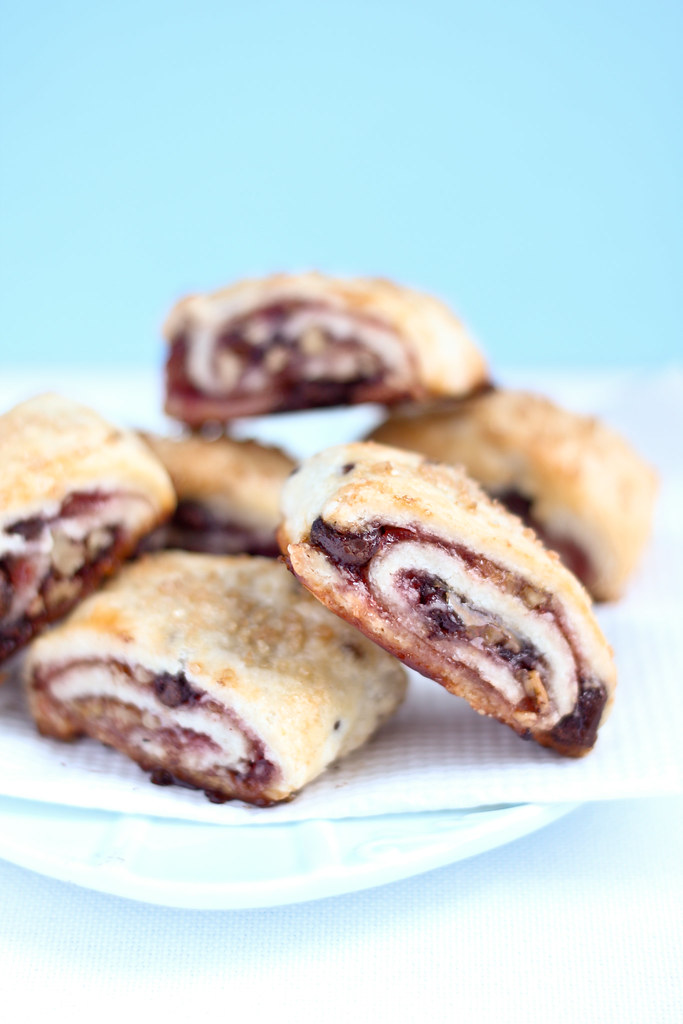
Remember how I confessed to just not being a "cookie lover"? Well, there must exist some technicality that prevents rugelach from being classified as a cookie, because as of today...I love rugelach. More realistically, I could love rugelach. I made an almost classic variation with raspberry jam, walnuts, and semisweet chocolate chips. The recipe is great, but I had mixed feelings about the batch I made. For one, I'm not a big fan of chocolate. I know...a food blogger that isn't fond of chocolate or cookies, some might consider it an oxymoron. If and when I make these again, I'll probably cut down on the chocolate and definitely make the trip to go buy some currants or dried fruit, because although the cookie itself was flaky and tender, the texture of the filling left much to be desired. I'm also sure that the fruity flavor of the currants would lighten up the richness of the chocolate. So I suppose what I'm saying is that I'm not in love with these cookies as much as I am in love with the idea of what they could be.
Please don't let my rambling stop you from trying these cookies. The fact that they're Dorie's should be enough motivation to get you in the kitchen. And besides, the majority of my reservations are based solely on my inability to stick to the recipe in the first place...as soon as I add those currants, I might as well delete this whole rant and simply post five gold stars underneath picture.
Enough, enough. Run away before I start up again, you can find the recipe here.
.jpg)